Kubernetes. Nowadays it seems companies in the industry are divided into two pools: those that already use it heavily for their production workloads and those that are migrating their workloads into it.
The issue with Kubernetes is that it is not a single system the way Redis RabbitMQ or PostgreSQL are. It is a combination of several control plane components (for example etcd, api server) that run our workloads on the user (data) plane over a fleet of VMs. The number of metrics coming out of control plane components, VMs and your workloads might be overwhelming at first glance. Forming a comprehensive observability stack out of those metrics requires decent knowledge and experience with managing Kubernetes clusters.
So how can you handle the flood of metrics? Reading this post might be a good place to start with 🙂
We’ll be covering the most critical metrics based on k8s’s metadata which form a good baseline for monitoring your workloads and making sure they’re in a healthy state. In order to have these metrics available you’ll need to install kube-state-metrics and Prometheus to scrape the metrics it exposes and store them for querying later on. We’re not going to cover the installation process here but a good lead is the Prometheus Helm Chart which installs both with default settings.
This is part of a series of articles about Kubernetes Monitoring.
The Most Critical Kubernetes Metrics to Monitor
For each of the listed metrics we’ll cover what the metric signifies, why you should care about it and how you should set your alerting according to it.
1. CPU / Memory Requests vs Actual Usage
What: Every container can (and should!) define requests for CPU and memory. These requests are being used by the Kubernetes scheduler to make sure it selects a node that has the capacity to host the pod. It does that by calculating the unused resources on the node considering its capacity minus the current scheduled pods requests.
Let’s look at an example to make this clearer: Let’s say you have a node with 8 CPU cores running 3 pods each with a single container that requests 1 CPU core. The node has 5 unreserved CPU cores for the scheduler to work with when it is assigning pods.

5 cores available for other pods
Keep in mind that by “available” we’re not referring to actual usage but rather to CPU cores that haven’t been requested (reserved) by pods currently scheduled into the node. A pod that requires 6 CPU cores won’t be scheduled into this node since there are not enough available CPU cores to host it.
The “actual usage” metric tracks how much of a resource the pod uses during runtime. When we measure actual usage it is usually across a fleet of pods (deployment, statefulset, etc) so we should refer to a percentile rather than a single pod’s usage. The 90th percentile should be a good starting point for this matter. For example, a deployment that requires 1 CPU core per pod might be actually using 0.7 cores on the 90th percentile across its replicas.
Why: Keeping the requests and the actual usage aligned is important. Requests that are higher than the actual usage leads to inefficient resource usage (under utilization). Think of what happens when a pod that requests 4 cores uses 1 core on the 90th percentile. K8s might schedule this pod into a node with free 4 cores which means no other pod will be able to use the reserved 3 cores that are not in use. In the diagram below we can clearly see that each pod reserved 4 cores but actually uses a single core meaning we’re “wasting” 6 cores on the node which will remain unused.
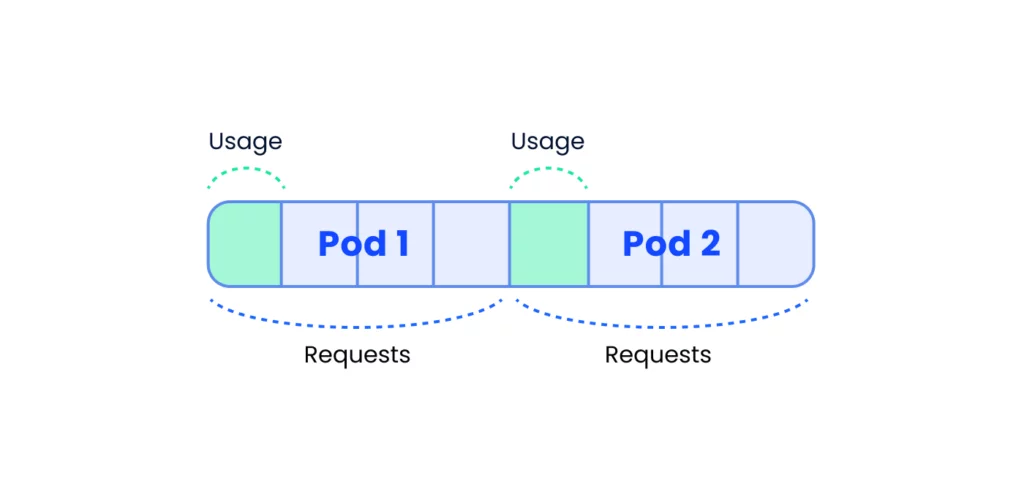
Requests are higher than actual usage = underutilization
Same goes for memory — if we set the request higher than the usage we’ll end up not using available memory.
The other option for misalignment is that the pod’s requests are lower than its actual usage (over utilization). In case of CPU overutilization, your applications will work slower due to insufficient resources on the node. Imagine 3 pods, each of them requests 1 core but actually uses 3. These 3 pods might be scheduled into a 8-core machine (1 request * 3 =3<8) but when they do, they’ll contest for CPU time since their actual usage — 9 cores — exceeds the number of cores on the node.
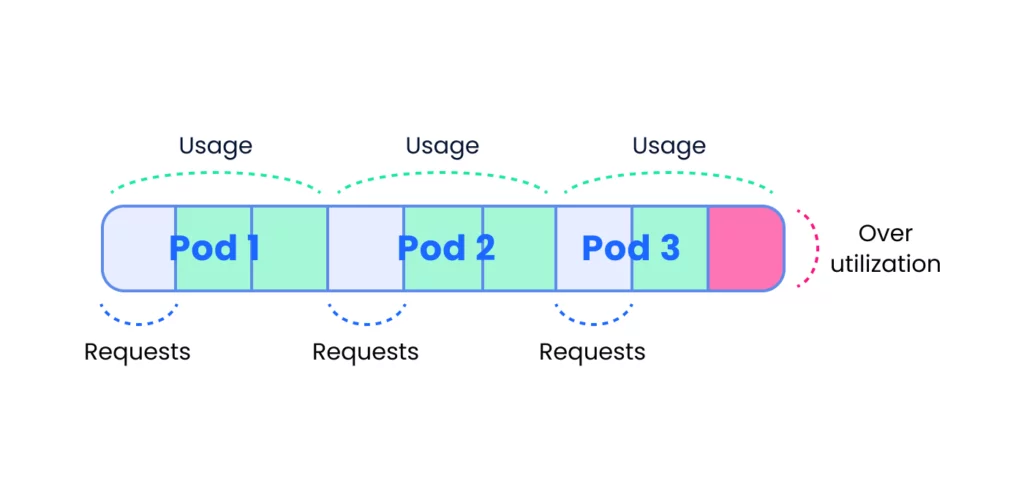
Pods actual usage exceeds the number of cores on a node
While with CPU you would experience slow application execution when memory requests are lower than required you might get into other kinds of issues. If we have 3 pods, each requests 1 GB of memory but uses 3 GB, they might all get scheduled into a node with 8GB of memory. On runtime, when a process tries to allocate more memory than the node has, it will get OOMKilled (Out Of Memory Killed) by the kernel and in the context of K8s, it will restart. When our process gets OOMKilled it will probably lose any inflight requests, be unavailable until it boots back up which leaves us under capacity and once it has booted, might suffer from a cold start due to cold caches or empty connection pools to its dependencies (databases, other services…).
How: Let’s define the pod requests as 100%. A sane range for actual usage (CPU or memory, it doesn’t really matter) would be 60%–80% on the 90th percentile. For example, if you have a pod that requests 10GB of memory, its 90th percentile of actual usage should be 6GB-8GB. If it is lower than 6GB you would be underusing your memory and wasting money. If it is higher than 8GB you’d get to a point where you’re risking getting OOMKilled due to insufficient memory. The same rule we applied for memory requests can be applied for CPU requests.
2. CPU / Memory Limit vs Actual Usage
What: While resource requests are being used by the scheduler to schedule workloads into nodes, resource limits allow you to define boundaries for the resource usage of your workloads during runtime.
Why: It is very important to understand the way CPU and memory limits are being enforced so you are aware of the implications of your workloads crossing them:
When a container reaches the CPU limit it will get throttled meaning it would get less CPU cycles from the OS than it could have and that eventually results in slower execution time. It doesn’t matter if the node hosting the pod has free CPU cycles to spare or not — the container is throttled by the docker runtime.
It is very dangerous to be CPU throttled without being aware of it. Latencies of random flows in the system spike up and it might be very hard to pinpoint the root cause if one of the components in the system is being throttled and you haven’t set the required observability beforehand. This situation could lead to partial service disruption or a full unavailability in case the throttled service takes part in core flows on our system.
Memory limits are being enforced differently than CPU limit: when your container reaches the memory limit it would get OOMKilled which has the same effect of it being OOMKIlled due to insufficient memory on the node: the process will be dropping inflight requests, the service will be under capacity until the container restarts and then it would have a cold start period. If the process accumulates memory fast enough, it might get into CrashLoop state — this state signals that the process is either crashing on boot or a short time after starting over and over again. Crashlooping pods usually translate to unavailability of the service.
How: The way to monitor resource limits is similar to the way we monitor CPU/memory requests. You should aim for up to 80% actual usage out of the limit on the 90th percentile. For example, if we have a pod that has a CPU limit of 2 cores and memory limit of 2GB the alert should be set for 1.6 cores of CPU usage or 1.6GB of memory usage. Anything above that introduces the risk of your workload being throttled or restarted according to the crossed threshold.
3. Percentage of Unavailable Pods Out of Desired Replicas
What: When you deploy an app you set the number of desired replicas (pods) it should be running. Sometimes some of the pods might not be available due to several reasons, such as:
- Some pods might not fit to any of the running nodes in the cluster due to their resource requests — these pods will transition into Pending state until either a node frees up resources to host them or a new node that meets the requirements joins the cluster.
- Some pods might not pass liveness/readiness probes meaning they are either restarting (liveness) or being taken out of the service endpoints (readiness).
- Some pods might reach their resource limits as mentioned above and get into Crashloop state.
- Some pods might be hosted on a malfunctioning node for various reasons and if the node is not healthy most chances are the pods hosted on it won’t function well.
Why: Having pods unavailable is obviously not a healthy state for your system. It may result anywhere between a minor service disruption to a complete service unavailability depending on the percentage of unavailable pods out of the desired number of replicas and the importance of the missing pods in core flows on your system.
How: The function we want to monitor here is the percentage of unavailable pods out of the desired number of pods. The exact percentage you should aim for in your KPIs depends on the criticality of the service and each of its pods in your system. For some workloads we might be OK with 5% of the pods being unavailable for a certain period as long as the system returns to a healthy state by itself and there’s no impact on customers. For some workloads even 1 unavailable pod might become an issue. A good example for that would be statefulsets in which each pod has its unique identity and having it unavailable might not be acceptable.
4. Desired Replicas Out of HPA Maximum Replicas
What: Horizontal Pod Autoscaler (HPA) is a k8s resource that allows you to adjust the number of replicas a workload is running according to a target function you define. The common use case is to auto scale by the average CPU usage of pods across a deployment compared to the CPU requests.
Why: When a deployment’s number of replicas reaches the maximum defined in the HPA you might get to a situation where you need more pods but the HPA can’t scale up. The consequences might differ according to the scale up function you’ve set. Here are 2 examples to shed more clarity:
- If the scale up function uses CPU usage then the existing pods’ CPU usage will increase to a point where they’ll reach their limit and get throttled (see bullet 2 for more on that). This eventually results in lower throughput for your system.
- If the scale up function uses custom metrics like the number of pending messages in a queue then the queue might start to fill up with pending messages introducing delay in your processing pipeline.
How: Monitoring this metric is pretty simple — you need to set a X% threshold for the division of the current number of replicas by the HPA max replicas. A sane X could be 85% to allow you to make the required changes before you hit the maximum. Keep in mind that increasing the number of replicas might affect other parts of the system so you might end up changing a lot more than an HPA configuration to enable this scale up operation. A classic example for that would be a database that hits its maximum connection limit when you increase the number of replicas and more pods try to connect to it. This is why taking a large enough buffer as preparation time makes a lot of sense in this case.
5. Nodes Failing Status Checks
What: kubelet is a k8s agent that runs on each of the nodes on the cluster. Among its duties, the kubelet publishes a few metrics (called Node Conditions) to reflect the health status of the node it runs on:
- Ready — True if the node is healthy and ready to accept pods
- DiskPressure — True if the node’s disk is short of free storage
- MemoryPressure — True if the node is low on memory
- PIDPressure — True if there are too many processes running on the node
- NetworkUnavailable — True if the network for the node is not correctly configured
A healthy node should report True on the Ready condition and False on all other four conditions.
Why: If the Ready condition turns negative or any of the other conditions turns positive it probably means some or all of the workloads running on that node are not functioning well and this is something you should be aware of.
For DiskPressure, MemoryPressure and PIDPressure the root causes are pretty obvious — a process writes to disk / allocates memory / spawns processes at a rate which the node cannot sustain.
The Ready and NetworkUnavailable conditions are a bit trickier and require further investigation to get to the bottom of the issue.
How: I’d start by expecting exactly 0 nodes to be unhealthy so that every node that becomes unhealthy would trigger an alert.
6. Persistent Volume Utilization
What: Persistent Volume (PV) is a k8s resource representing a block of storage that can be attached and detached to pods in the system. PV’s implementation is platform specific, for example, if your Kubernetes deployment is based on AWS, a PV would be represented by an EBS volume. As with every block storage, it has a capacity and might get filled with time.
Why: When a process uses a disk that has no free space hell breaks loose as the failure might be symptomized in a million different ways and the stack traces do not always lead to the root cause. Apart from saving you from a future failure, watching this metric could also be used for planning on workloads that record and add data with time. Prometheus is a great example for such a workload — as it writes data points to its time series database, the amount of free space in the disk decreases. Since the rate Prometheus writes data at is pretty consistent, it is easy to use the PV utilization metric to forecast the time you would need to either delete old data or purchase more capacity for the disk.
How: The kubelet exposes both PV usages and capacity so a simple division between them should do the trick to provide you with the PV utilization. It’s a bit hard to suggest a sane alert threshold as it really depends on the trajectory of the utilization graph but as a rule of thumb give yourself at least two-three weeks heads up before you deplete your PV storage.
Tips from the expert

Itiel Shwartz
Co-Founder & CTO
In my experience, here are tips for metrics to watch for on your kubernetes cluster:
Balance CPU/Memory Requests and Usage
Ensure requests align with actual usage to avoid underutilization or overutilization.
Monitor CPU/Memory Limits
Keep usage below 80% of limits to prevent throttling and OOM kills.
Track Unavailable Pods
Monitor the percentage of unavailable pods to maintain service health.
Observe HPA Max Replicas
Avoid hitting max replicas to prevent resource contention.
Check Node Conditions
Watch for unhealthy nodes to ensure cluster stability.
Measure PV Utilization
Forecast storage needs to avoid disruptions due to full volumes.
Summary
As you already figured out, handling a Kubernetes cluster is not an easy task. There are tons of metrics available and it requires a lot of expertise to pick the important ones.
Having a dashboard monitoring key metrics for your cluster could be used both as a preventive measure to avoid issues in the first place or as a tool to troubleshoot issues in your system once they sneak in.
Luckily, all the knowledge on how to do that right is out there on the web for you to explore, learn and implement. Another option is to use an off-the-shelf solution like Komodor, a tool that helps dev and ops teams stop wasting their precious time looking for needles in (hay)stacks every time things go south.
To learn more about how Komodor can make it easier to empower your teams to independently troubleshoot Kubernetes-related issues, sign up for our free trial.
